How to install and use a RedWing BMS

Watch the movie! To download click here:
This movie shows the install for rev 1 harness along with a RedWing BMS. The harness is now in rev2 with improved plugs. Insertion is now easy and straight forward.
RedWing BMS installation instructions for 48v Chevy Volt modules:
The RedWing BMS is really nice stable, reliable, efficient battery cell voltage manager. It does one thing. Keeps your battery cells balanced. And this contributes to safety and pack longevity. Huzzah!
Note that the RedWing is available in custom configurations. We have done 6S; 14S (for Nissan Leaf packs) and will be introducing 16S by March 31.
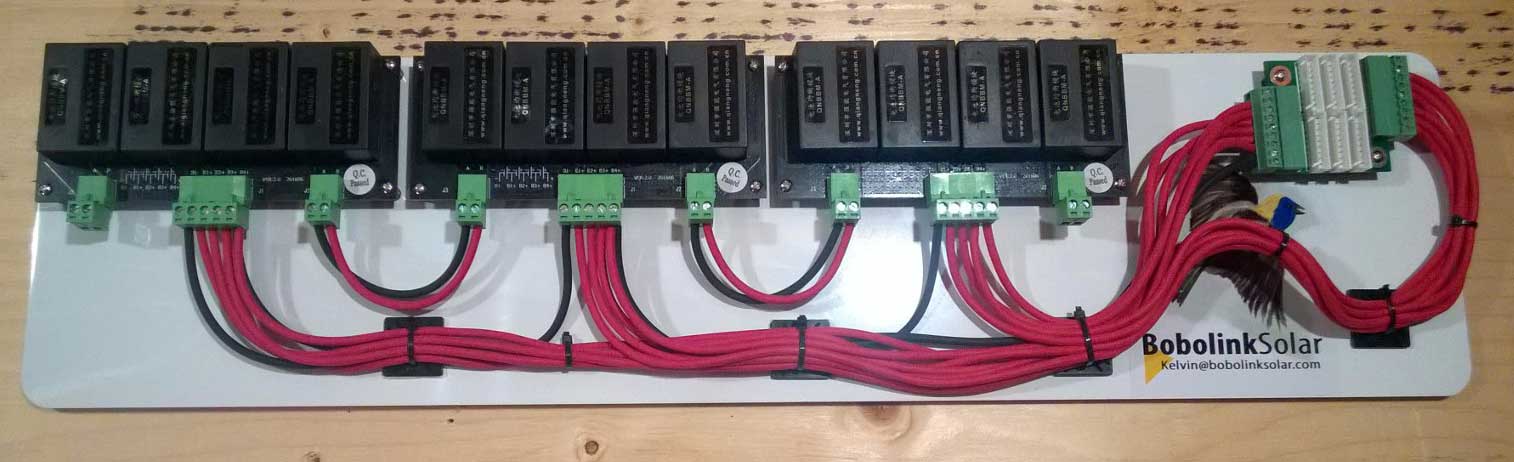
Once installed your RedWing BMS should look something like this. This is a test bench assembly, so your install will be neater.

NB: Make sure the battery modules are connected together or are absolutely the same voltage (state of charge).
Use a voltmeter to double/triple check.
Step by step: Harness install
* Remove the Orange Volt Plug(s).
* Plug the harnesses into the receptacle now left open.
Ensuring you put the plug clip into the plug clip side. Should be pretty clear.
Top tip: A tip for easier insertion is to make sure you go straight down with the plug. Do NOT force. This can bend the prongs and that’s bad.
However, I have tested your unit so if you go straight down you should be fine. I don’t have your modules. So it probably doesn’t hurt to check that all the prongs are straight up.
* Now plug all your modules in. Touch the wires. If there’s any heat at the plug remove. However, there shouldn’t be.
PCB install
Okay. Now all your modules have a harness plug attached.
* So look at the small plugs. These plug into the BMS PCB.

Here’s the PCB not yet attached to the BMS board with the harness to BMS plugs attached.
Top tip: The only trick is to do the BLACK one first. Put it in the BLACK marked side (black or red marker as indicated). The plugs only go one way.
There’s some little guidy things that make sure you put it in the right way.
* Now. Depending on your hearing you’ll hear a high pitched sound coming from the BMS.
That’s good. Keep your fingers on the yellow wires by the plug. If there’s no sound and the plug warms up. Remove immediately.
Of course, your system is tested already so that shouldn’t happen. Smile.
Now put the unmarked plug into the unmarked receptacle. Make sure its on the same row as the first marked plug to make adding additional harnesses easier.
You’re done.
Huzzah!
How easy was that. Your RedWing BMS is now operational and requires no maintenance for the next 10 years.